As the festive season is approaching and a lot of people has busy hands… including myself I have decided to slow down on the posting activity. I hope that all my loyal crochet learners and followers will not mind fortnightly posting instead of weekly. I believe there is so much to do during a holiday and Christmas season so there is only a little time left for learning new crochet stitches… 🙂
At this article I will explain crochet decrease techniques, which are used for shaping the edges (end of the rows) of the crochet projects.
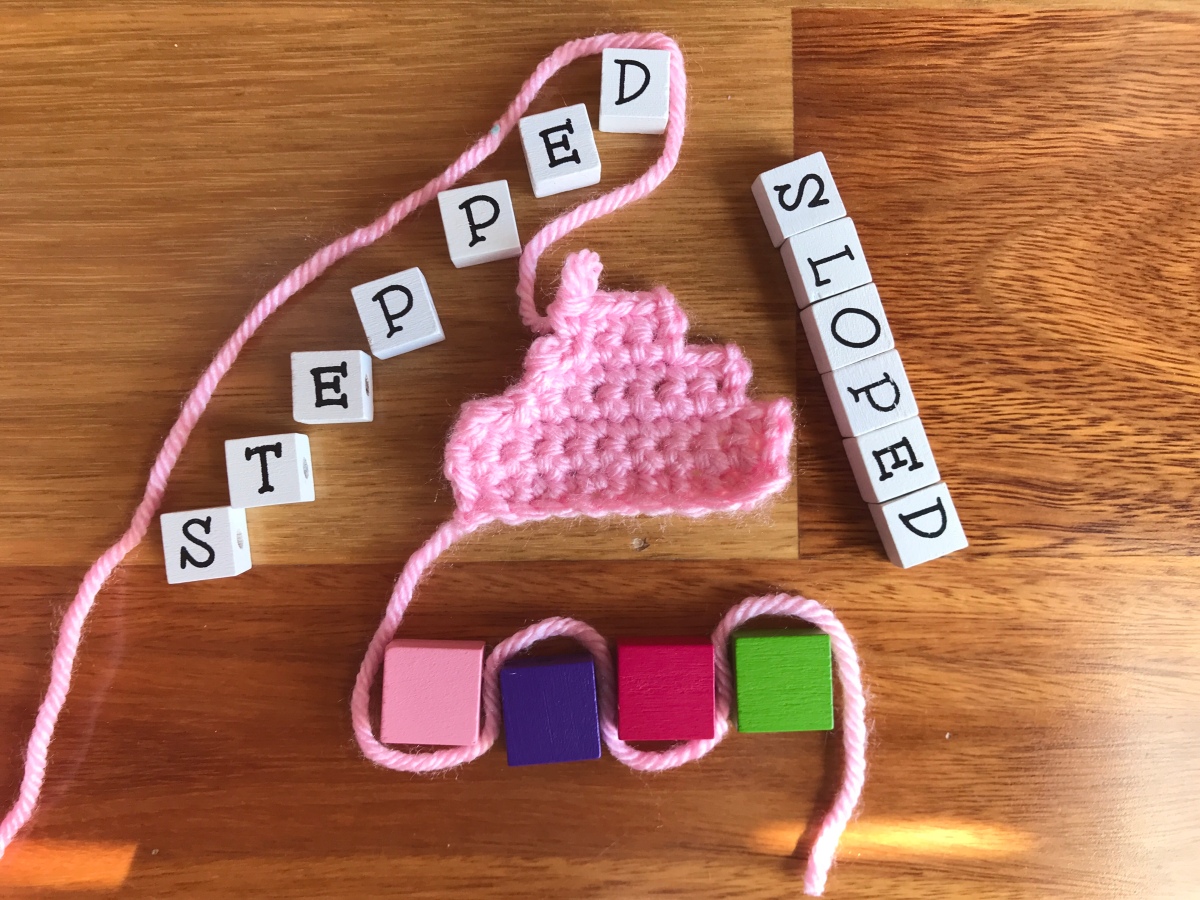
Stepped technique is usually used, when you working on a project with edging – e.g. blanket, table cloth or any other decorative items and you want to have the edging to be stepped (e.g. staircase look). It is good for making a Christmas Tree appliqués too :).
Or also you can use this technique, when you are making pullover sleeve, which is going to be looking like smocking/ shirring stitch was used on the shoulder attachment. When such sleeve is fitted into the rest of the front and back piece it creates the creases around the armhole and shoulder making them looking like puff sleeve (90’s look is back in trend… I know 🙂 ).
Sloped technique is usually used, when you need a mild transition on the edges. E.g. shaping a sleeve of a jumper, while using a taller stitch (double crochet, treble or anything taller than that).
1. Stepped decrease at the end of the row
- Stitch the required number of rows without decrease (in my case 11 SC).

- Turn your work without working any turning chains!
- Insert the hook, from front to back, through the first stitch of the row and wrap the yarn in the barb of the hook.

- Pull the yarn through both stitches and loops on the hook.

- 1 loop remains on the hook.

- Take the hook through the next stitch of the previous row and complete the slip stitch as before. (how to make slip stitch How to make a Slip Stitch (ss) the smallest stitch of all)

- Continue working slip stitches across the row until you have decreased the required number of stitches ( in my case 5 stitches).

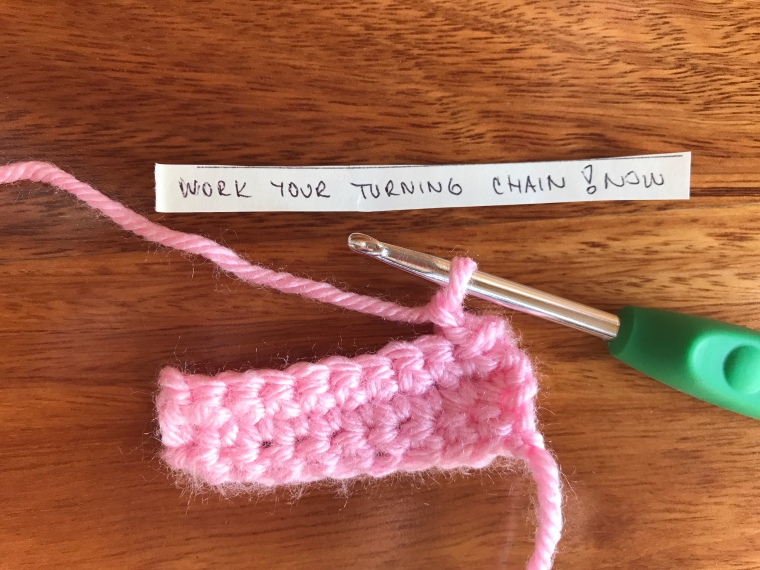
- Work required number of turning chains (in my case 1 CH), but DO NOT TURN THE WORK !
- Work stitches across the row as required.

- You may also wish to decrease in the same way on the opposite end of the work. Stop stitching before the end of the row, leaving the required number of stitches unworked (in my case 5 stitches).
- Work your turning chains (in my case 1 CH), turn your project and begin the next row.
- A little project with STEPPED decrease on the picture below:

2. Sloped decrease at the end of a row
Note: this is best used for double crochet and longer stitches rather shorter stitches like single or slip stitch. This example is using a treble stitch as the main stitch for demonstration.
- Stitch the required number of rows without decrease in treble stitches (Treble Crochet Stitch (tr) – Double “Trouble”) – in my case 10 TR and 3 CH.

- Turn your project. Work 1 CH for turning.

- Work SC (single crochet stitch) into the first stitch of the previous row.

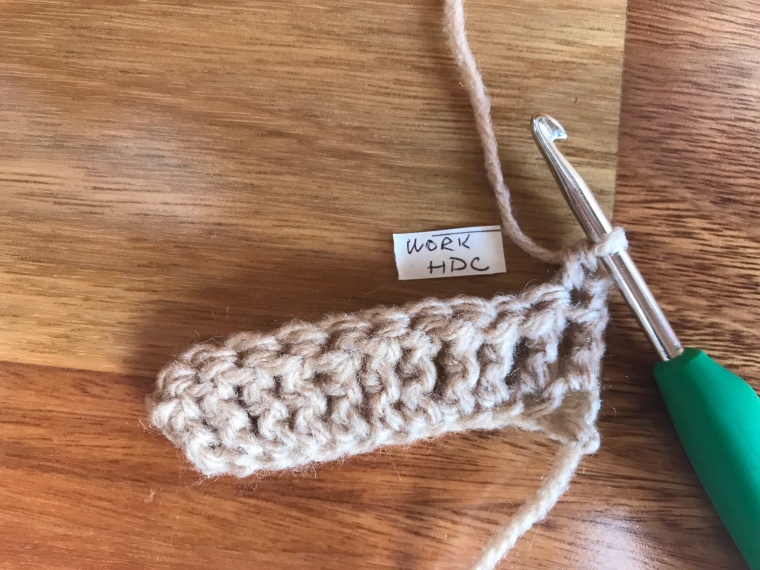
- Work HDC (half double crochet stitch – Half Double Crochet – half short & half long) into the second stitch of the previous row.
- Work DC (double crochet stitch – How to make Double Crochet (dc) – Treble Crochet (tr) stitch) into the third stitch of the previous row.

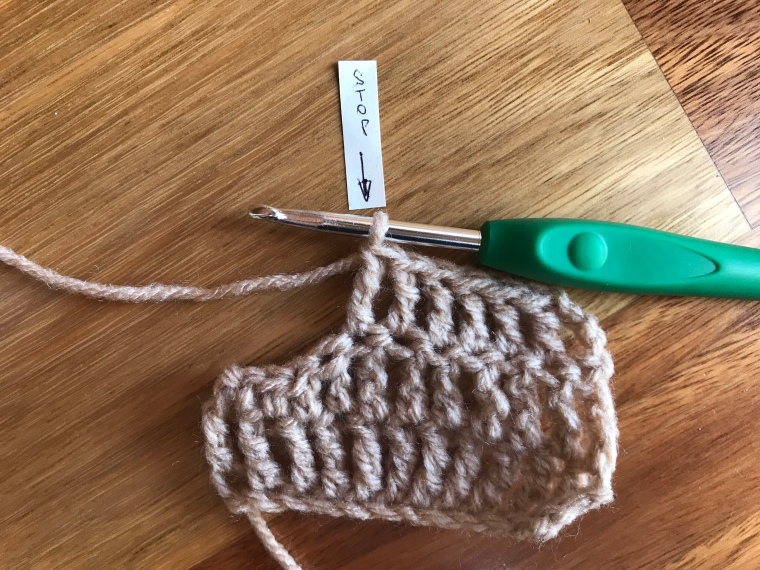
- Work TR (treble crochet stitch – Treble Crochet Stitch (tr) – Double “Trouble”) into the fourth stitch of the previous row. Continue working stitches in TR across the row.

- If you want to have the same sloped decrease at the other end of the row as well, you need to start the shorten the stitches in reverse order.

- 4 stitches prior to the end of the row – work 1 x TR, 1 x DC, 1 x HDC and 1 x SC to the last stitch.


- Work one turning chain (in my case 3 CH) and turn your project. You may decrease again or work in TR across – depends what pattern tells you and what are you shaping.
- A little project with SLOPED decrease on the picture below:

Iva’s crocheting tips
- MARKERS – if you need to increase / decrease at the same position in all your rows (subsequent rows) of your project, place a marker (what is a marker or what else can be used instead of a marker is explained here in my previous article What you need to start – Basic Crochet Supplies
- EDGES – to keep neat and straight edges, while you are decreasing or increasing try to avoid using the very last stitch at the end of the row (if your pattern allows you to do that). Instead decrease or increase at the second (adjacent) stitch to the very last one. But as mentioned, not always possible to be done, sometimes you need to use the very last one stitch.
- SLOPE/ STEEPNESS OF THE SHAPE – the slope of the shape is determined by what type stitch you are working and also how steep you want the slope. E.g. row with half double crochet (Half Double Crochet – half short & half long) will require 1 x single crochet (Chain stitch & Single Crochet Stitch) to create the slope. A row of double crochet stitches (How to make Double Crochet (dc) – Treble Crochet (tr) stitch) will require 1 x half double crochet & 1 x single crochet stitch to create a slope and etc. I would not use slope decrease for anything shorter than half double crochet.
Happy Crochet Shaping!
I.
